Resources |
| Collections |
| Contact: photoguide@tiono.com |

Chapter 2. The Lights
Revision 1.0 2006. Copyright
by Tiono
Email: photoguide@tiono.com
|
|
|
Photography is about capturing
light. When there is no light, then there is no photograph can be made. |
Quality of light. What does it mean? |
|
The word "quality" here, is not referring whether the light is good or bad, but associated toward its suitability for certain type of photo-taking. For example: a very contrasty light may be bad for a family portrait, but it can be very nice for an artistic portraiture. The quality of light is determined by four parameters: eveness, brightness, color, and direction. |
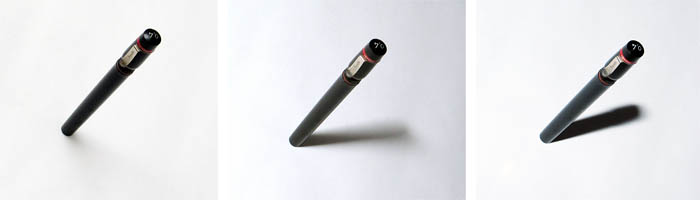
| ..... | Eveness | The light is
evenly distributed (diffused), and shadow will tend to disappear, or
soft. This kind of light is called "soft light". On the other end;
if the light is not evenly distributed, but stronger in certain direction,
then it is called "hard light". Hard-light tends to create
a picture with higher contrast. See the pictures below: |
 |
||
| The leftmost image,
was taken with evenly distributed light, while the rightmost image was taken
with a hard-light. See the difference of its shadow. The one taken using
soft-light, created almost no shadow at all, while the one taken using hard-light
has the most prominent shadow. The hard-light is usually useful in revealing textures on a complicated surfaces, and also in the high-contrast photography (we will look further about this on another chapter). |
||
| Brightness | Although
the camera can be adjusted to maintain a correct exposure, but there is a limit where the camera may not be
able to record faithfully if the light is too dim. Insufficient light brightness
will result in higher noise, or grain in film. This
is undesirable for most photography, especially macro photography. Therefore, to take a good picture of your miniature-models, the light must be sufficiently bright to allow a proper exposure at small aperture (f/8 at least) |
| Color | Most
of the objects, including miniature-models, do not emit its own light, but
reflecting the light from other light sources. Therefore the color of the
light-source will influence the resultant color. If the light is bluish,
then the resultant color will be dominated by blue component. If the light
comes from a tungsten bulb, then the yellow component will dominate. |
| Direction | The
directions of light relate closely with the eveness. A diffused light
is omni directional, which emit the same intensity toward all directions. But if
some of the light emit greater intensity toward certain direction, then
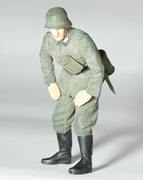
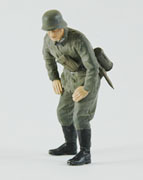
we start to see a directional light (called "hard light"). In taking a picture of miniature-models, you have to pay attention on the light direction as it will affect the impression of the photograph. Look at the different results on the photographs of a 1/35 scale figure below: |
|
 |
Frontal
lighting The light was coming from the camera's position, using a flash which is attached to it. The photo looks flat. Frontal lighting is less desirable in photographing miniature-models. |
||
 |
 |
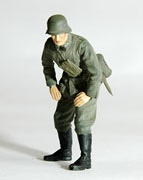
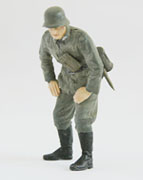
Side
lighting A dominant light source was positioned on the right-hand side. Here we can see the photo give a contrasty shadow on the figure, effectively enhances its texture and shape. This lighting direction is often used to create dramatic pictures. |
||
 |
 |
Dual
lighting In this scenario, two separate light sources were used, placed at the right and left hand side respectively. Both light sources emit the same intensity. The result is a nice photograph, we can see the texture and shape, without excessive shadow. |
||
 |
 |
Diffused
lighting Two light sources and soft boxes create a very soft light, there is no shadow, and the figure is illuminated evenly. Soft lighting will works for most of the miniature-models, although it may not enhance the texture and shape dramatically. |
The Reflector |
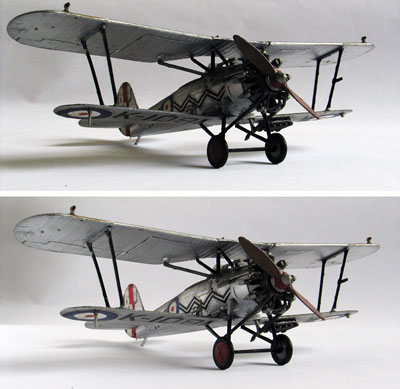 |
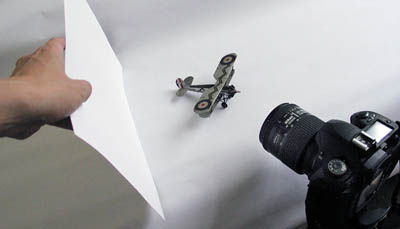 Photographs on the left show the difference a reflector can make. The first photo was taken without reflector, a single light coming from the window. While the other photo was taken with a paper reflector (as shown above). The one taken with reflector is better, with the detail of aircraft's body clearly visible. |
|